LaTeX极速教程
Author : zbzhen, Modified : Tue Feb 27 12:17:48 2024
-
LaTex符号大全, 也可在命令行输入:
texdoc symbols-a4
1. 安装
-
建议把LaTeX安装在固态硬盘里
-
安装的路径最好不要有中文
-
嫌麻烦, 也可以点我试试在线版本
1.1. win上安装
-
win7系统(win10无需下载)推荐官方下载免费开源的光盘驱动 WinCDEmu, 体积不到1M. 如果不方便的话可以用本站的资源点我下载WinCDEmu-4.0.
-
下载texlive, 推荐用高校的镜像, 体积将近4G
texlive清华镜像
texlive中科大源
texlive上海交大 -
用
WinCDEmu打开texlive.iso,我的电脑的可移动设备下会立马出现一个CD 驱动器 (H:) TexLive, 进入这个驱动磁盘, 打开install-tl-windows可进行安装. win10系统只需右键点texlive.iso, 然后选择装载.千万别直接解压
texlive.iso, 因为慢且可能损坏文件
千万别直接解压texlive.iso, 因为慢且可能损坏文件 -
建议用texlive, 因为安装速度更快
1.2. linux上安装
在线安装
-
需要网络好,安装时间长,需要的空间大约6G
sudo apt install texlive-full -
中途如果出现网络问题,快捷键Ctrl +C中断掉,然后重新输入安装命令
sudo apt install texlive-full,前面下载好的文件可以不用继续下载
离线安装
如有有了texlive2023.iso文件则可离线安装
选择默认安装
sudo mkdir /mnt/texlive
sudo mount ./texlive2023.iso /mnt/texlive
sudo /mnt/texlive/install-tl
安装好之后删除文件夹
sudo umount /mnt/texlive
sudo rm -r /mnt/texlive
设置环境变量
vim ~/.bashrc
在打开的文件末尾添加
# Add TeX Live to the PATH, MANPATH, INFOPATH
export PATH=/usr/local/texlive/2023/bin/x86_64-linux:$PATH
export MANPATH=/usr/local/texlive/2023/texmf-dist/doc/man:$MANPATH
export INFOPATH=/usr/local/texlive/2023/texmf-dist/doc/info:$INFOPATH
保存并退出。
验证安装是否成功
在终端输入tex -V,观察是否正确打印TeX版本信息
字体处理
注意:以下命令均需要将/usr/local/texlive/2023/改为自己的安装路径
sudo cp /usr/local/texlive/2023/texmf-var/fonts/conf/texlive-fontconfig.conf /etc/fonts/conf.d/09-texlive.conf
将配置文件复制到系统,然后继续执行
sudo fc-cache -fsv
来刷新字体缓存。
至此便已成功安装
注意事项
出现bug:fc-cache: command not found.这是因为没有安装对应的包
sudo apt-get install fontcon
参考: https://blog.csdn.net/qq_44079386/article/details/128523134
1.3. mac安装
参考
https://www.tug.org/mactex/index.html
2. 编辑器的选择
推荐用免费开源跨平台的编辑器
-
texstudio官网容易抽风, 推荐用 texstudio清华镜像.
-
vscode, 它需要额外安装
LaTeX Workshop插件以及手动配置 -
VSCodium 用法和vscode是完全一样的, 感觉速度比vscode快一点, 不过插件没有vscode全面
-
要注意
winedit是收费的编辑软件, 如果想用winedit请支持正版. 想白漂, 推荐texstudio或vscode.
texstudio优势很明显: 免费, 跨平台, 简单, 方便.
vscode 配置稍微麻烦一丢丢, 但真的好用
vscode下载速度慢, 只需把下载链接中的az764295.vo.msecnd.net 改写成 vscode.cdn.azure.cn.
例如把
修改成
也可以选择 vscode 开源替代品 VSCodium, 两者没什么特别大区别, VSCodium高校镜像为
https://mirrors.tuna.tsinghua.edu.cn/github-release/VSCodium/vscodium/
-
如果中文LaTex论文将近两百页
-
我用vscode会比较卡顿, 但是vscodium用起来流畅
-
当然也可能是因为我的vscodium只安装了一个LaTex Workshop插件
-
所以我两个编辑器都安装了
2.1. texstudio相关配置
Options(选项) --> Configure(设置) --> Build(构建) --> Default Compiler(默认编译器): XeLatex
2.2. vscode相关插件
在用latex的同时, 推荐用一用markdown, 参考Markdown终极教程
这里给出latex和markdown的相关插件
File --> Preference --> Extensions
-
LaTeX Workshop
编译latex -
Rainbow Brackets
彩虹括号 -
Bracket Jumper
括号跳转 -
LTeX
latex 拼写检查 -
English word hint
英语提示 -
Markdown TOC
Markdown 书签 -
Paste Image
Markdown 快速插入图片 -
Markdown Preview Enhanced
-
Markdown Preview Mermaid Support
LTeX是latex的拼写和语法检查插件, 非常实用
English word hint 可以提示和翻译英文
后面几个插件都是Markdown的插件
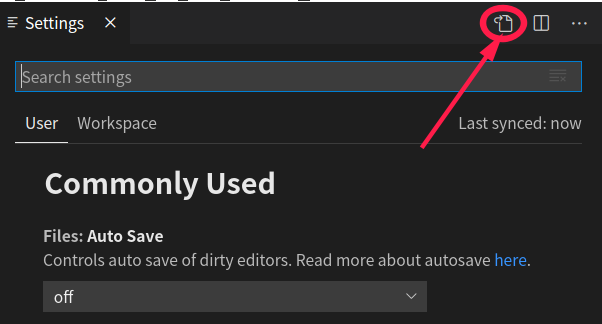
2.3. vscode相关配置
File --> Preference --> Settings --> Opening Settings, 其中Opening Settings按钮在分页按钮左边,
也可以直接用快捷键Ctrl+, 然后点击下图红圈所在地方
该配置文件它会自动运行bibtex, 为了保证参考文献不出现[?], 需要多运行两次, 保存就可以运行, 快捷键 Ctrl+S, 不建议自动保存, 推荐没事就手动保存, 保证写代码和文档的Hits不断
不需要安装额外的PDF阅读器, 该配置文件可以跨平台通用
不需要安装额外的PDF阅读器, 该配置文件可以跨平台通用
{
  //// vscode-fileheader, Ctrl + Alt + i
  "fileheader.Author": "zbzhen",
  "fileheader.LastModifiedBy": "zbzhen",
  "update.mode": "none",
  "extensions.ignoreRecommendations": true,
  // "editor.fontSize": 17,
  "editor.wordWrap": "on",
  "editor.cursorBlinking": "solid",
  "editor.wordWrapColumn": 80,
  "editor.wrappingIndent": "same",
  "editor.renderControlCharacters": true,
  "editor.minimap.enabled": false,
  "editor.renderWhitespace": "all",
  "workbench.activityBar.visible": true,
  "workbench.colorCustomizations": {
    // 设置光标颜色
    "editorCursor.foreground": "#FF0000",
    "editor.lineHighlightBackground": "#e9eeee3d",
    "editor.lineHighlightBorder": "#a8a6a630",
  },
  "telemetry.enableCrashReporter": false,
  "telemetry.enableTelemetry": false,
  "latex-workshop.latex.recipes": [
    {// 万能方法, 推荐用它, 其实可以不用后面的两种方案
      "name": "LaTeXmk",
      "tools": [
          "latexmk"
      ]
  },
    { // 含参考文献的编译
      "name": "xelatex -> bibtex",
      "tools": [
          "xelatex",
          "bibtex"
      ]
    },
    { // 用于没有参考文献的编译
      "name": "xelatex",
      "tools": [
          "xelatex"
      ]
    },
  ],
  "latex-workshop.latex.tools": [{
    "name": "latexmk",
    "command": "latexmk",
    "args": [
      "-synctex=1",
      "-interaction=nonstopmode",
      "-file-line-error",
      "-pdf",
      "%DOC%"]
    }, {
    "name": "xelatex",
    "command": "xelatex",
    "args": [
      "-synctex=1",
      "-interaction=nonstopmode",
      "-file-line-error",
      "%DOC%"]
    }, {
    "name": "pdflatex",
    "command": "pdflatex",
    "args": [
      "-synctex=1",
      "-interaction=nonstopmode",
      "-file-line-error",
      "%DOC%"]
    }, {
    "name": "bibtex",
    "command": "bibtex",
    "args": [
      "%DOCFILE%"]
  }],
  "latex-workshop.view.pdf.viewer": "tab",
  "latex-workshop.message.error.show": false,
  "latex-workshop.message.warning.show": false,
  "latex-workshop.latex.autoClean.run": "onFailed",
  "latex-workshop.showContextMenu":true,
  "latex-workshop.intellisense.package.enabled": true,
  "latex-workshop.latex.recipe.default": "lastUsed",
  "diffEditor.ignoreTrimWhitespace": true,
  "timeline.excludeSources": [],
  "workbench.statusBar.visible": true,
  // "files.autoSave": "afterDelay",
  // "files.autoSaveDelay": 5000,
  "[markdown]": { // English word hint
    "editor.quickSuggestions": true
  },
  "window.zoomLevel": 1,
  "files.eol": "\n",
}
2.4. vscode个人快捷键
File --> Preference --> Keyboard Shortcuts --> Opening Keyboard Shortcuts, 其中Opening Keyboard Shortcuts按钮在分页按钮左边
快捷键可自行选择设置,
[
    {
        "key": "ctrl+d", // 复制粘贴上一行代码
        "command": "editor.action.copyLinesDownAction"
    },
    {
        "key": "ctrl+q", // 注释
        "command": "editor.action.commentLine",
    },
    {
        "key": "ctrl+shift+a", // LaTex定位到pdf
        "command": "latex-workshop.synctex",
    },
    {
        "key": "alt+x", // 停止LaTex编译
        "command": "latex-workshop.kill",
    },
    {
        "key": "alt+q", // 选择LaTex编译器
        "command": "latex-workshop.recipes"
    },
]
2.5. 用vscode 实现PDF和tex文件双向定位
- 按Ctrl 同时单击鼠标左键PDF可定位到tex 文件
- 鼠标右键点击 tex 文件, 选择
syncTex from corsor即可定位到PDF.
2.6. 小技巧
-
如果文档太长, 需引用前文公式标签
\eqref{}, 怎样的办法最好?
答: 鼠标悬浮到PDF的顶部, 可出现菜单. 菜单的最左边一个按钮, 可以把目录显示出来; 合理利用好菜单上的<与>按钮会有奇效. -
Linux 下编译 tex 比win更快
3. LaTeX模板
3.1. 模板下载
下载地址:
3.2. ppt模板
如果用vscode编辑器的, 需要选择无文献编译模式, 可通过本文设置的快捷键Alt+Q选择xelatex
3.3. 文档模版
该模板可以跨平台支持, 如果该模板出现问题, 解决的办法
-
需要创建
proposal.bib文件, 并且写上内容@article {bibref, AUTHOR = {张三}, TITLE = {我是论文题目菌}, journal={顶级刊物}, volume={133}, number={3}, pages={319--346}, year={2100}, }
-
多运行两次
-
重启软件或机器
-
文件或文件夹的名字是英文
-
嫌麻烦就 直接下载
\documentclass[a4paper, 12pt, UTF8]{ctexart}

\usepackage{color,xcolor}

% \usepackage{showkeys}
% \usepackage[notref,notcite]{showkeys}
\usepackage[colorlinks,
            linkcolor=blue,
            anchorcolor=blue,
            citecolor=blue,
            ]{hyperref}
% \hypersetup{hidelinks} %隐藏链接的样式

\usepackage{listings}
\lstset{
    language = Python,
    breaklines=true,  %代码过长则换行
    % escapeinside=``,
    xleftmargin=1.5em,
    xrightmargin=0.5em,
    aboveskip=1em,
    % numbers=left, %行号在左侧显示
    numberstyle= \scriptsize,%行号字体
    basicstyle=\small,
    % stringstyle=\color{mauve},
    keywordstyle= \color{blue},%关键字颜色
    % commentstyle=\color{gray}, %注释颜色
    % frame=shadowbox, %用方框框住代码块
    frame=single, %用方框框住代码块
}
\usepackage{amssymb}
\usepackage{amsfonts}

\usepackage{geometry}
\geometry{a4paper,left=2cm,right=2cm,top=2cm,bottom=2cm}

\parskip 0.2cm
\parindent=2\ccwd
\makeatletter
\newcommand{\figcaption}{\def\@captype{figure}\caption}
\newcommand{\tabcaption}{\def\@captype{table}\caption}
\makeatother
\usepackage{amsmath}
\usepackage{mathrsfs}
\usepackage{amsthm}
\usepackage{bm}
\usepackage{amsrefs}
\usepackage{epstopdf}
\usepackage{epsfig}
\usepackage{lineno}
\usepackage{booktabs}
\usepackage{multirow}
%\usepackage{cite}
\usepackage{graphicx}
\usepackage{subfigure}
\usepackage{caption}
\usepackage{float}
\usepackage[rightcaption]{sidecap}
\usepackage{fancyhdr}
% \usepackage{mathbbold}
\usepackage{titlesec}
\DeclareMathOperator\dif{d\!}

\newcommand{\tabincell}[2]{\begin{tabular}{@{}#1@{}}#2\end{tabular}}

\usepackage{titlesec}
\usepackage{titletoc}
% \titlecontents{section}[1.1cm]{\bf \large}
%{\contentslabel{2.5em}}{}{\titlerule*[0.5pc]
%{$\cdot$}\contentspage}

\newcommand{\xiaosi}{\fontsize{12pt}{18pt}\selectfont}
\newcommand{\xiaosan}{\fontsize{15pt}{\baselineskip}\selectfont}
%\renewcommand{\normalsize}{\xiaosi}

\makeatletter
\@addtoreset{equation}{section}
\makeatother

\renewcommand{\thefigure}{\thesection.\arabic{figure}}
\renewcommand{\thetable}{\thesection.\arabic{table}}
\renewcommand{\theequation}{\thesection.\arabic{equation}}
\titleformat{\section}{\centering\zihao{3}\bf}{第\, \thesection\, 章}{1em}{}
\titleformat{\subsection}{\zihao{-3}\bf}{\thesubsection}{1em}{}
\titleformat{\subsubsection}{\zihao{4}\bf}{\thesubsubsection}{1em}{}

%%%%%%%%%%%%%%%%%%%%%%%%%
%%%%% 下面是中文格式 %%%%%
\newtheorem{lemma}{引理}[section]
\newtheorem{theorem}{定理}[section]
\newtheorem{definition}{定义}[section]
\newtheorem{corollary}{推论}[section]
\newtheorem{proposition}{性质}[section]
\newtheorem{remark}{注}[section]
\newtheorem{example}{例}[section]
\newcommand{\bs}[1]{\boldsymbol{#1}}
\renewcommand{\proofname}{\bf{证明:}}

%%%%% 上面是中文格式 %%%%%
%%%%%%%%%%%%%%%%%%%%%%%%%
%%%%% 下面是英文格式 %%%%%
% \newtheorem{lemma}{Lemma}[section]
% \newtheorem{theorem}{Theorem}[section]
% \newtheorem{definition}{Definition}[section]
% \newtheorem{corollary}{Corollary}[section]
% \newtheorem{proposition}{Proposition}[section]
% \newtheorem{remark}{Remark}[section]
% \newtheorem{example}{Example}[section]
% \renewcommand{\proofname}{\bf{Proof:}}
% \renewcommand{\refname}{References}
% \renewcommand{\contentsname}{Contents}
% \ctexset{today=old}
% \date{\today}
% \title{Title}
% \author{San Zhang}
%%%%% 上面是英文格式 %%%%%
%%%%%%%%%%%%%%%%%%%%%%%%%
\makeatletter
\renewenvironment{proof}[1][\proofname]{\par%
\pushQED{\qed}%
\normalfont \topsep6\p@\@plus6\p@\relax%
\trivlist%
\item[\hskip\labelsep%
#1]\ignorespaces%
}{%
\popQED\endtrivlist\@endpefalse%
}
\makeatother

\newenvironment{innerproof}
 {\renewcommand{\qedsymbol}{}\proof}
 {\endproof}

 \title{我是题目菌}
 \author{作者菌}


\begin{document}

\maketitle
\tableofcontents
\newpage

\renewcommand{\thepage}{\arabic{page}}
\pagestyle{plain}
\pagenumbering{arabic}\setcounter{page}{1}
\thispagestyle{plain}

\xiaosi\songti

\section{我是大标题}
这是一个比较实用的latex模板
\subsection{小标题1}
这个模板可以自动生成中文书签和模板
\subsection{小标题2}
这个模板还可以自动生产参考文献,

需要在该文件夹的目录下创建一个proposal.bib文件

\subsubsection{小小标题}
公式测试
\begin{equation}\label{11}
x + \theta = \beta
\end{equation}
上面的公式\eqref{11}

\cite{bibref}
\newpage
\bibliographystyle{plain}
\bibliography{proposal}

\end{document}
4. 工具推荐
-
LaTeX常用符号, 好用无广告
-
LaTeX手写识别公式, 好用但有广告
-
LaTeX手写识别公式, 好用无广告, 并且顺带作图
-
LaTeX图片识别公式, 限定次数免费
-
目前图片识别 推荐使用1 https://simpletex.cn/ai/latex_ocr
-
目前图片识别 推荐使用2 直接用gpt-4-vision-preview, 分辨率不要太高, 提示词为:
只回复图片上的文字信息,若图片信息`解方程x^2=9`,则只回答`解方程x^2=9` -
GeoGebra数学画图, 开源个人用免费, 商用谨慎.
右键框选需要导出的图, 先导出为svg,
最后用浏览器把svg转变为pdf -
drawio流程图, 免费开源, Apache-2.0协议
-
在线表格生成LaTex tablesgenerator, 好用但可能有广告
-
离线表格生成Excel2LaTeX, 下载慢可点我下载, 然后点击表格的
开发者工具-->加载项-->浏览(找到Excel2LaTeX.xla文件)-->确定[这个配置步骤只需设置一次], 点击加载项即可将选中的表格导出.tex文本, 实际转出的LaTex表格会出现\bigstrut而导致无法正0常编译, 将它删除即可. 该方法支持wps表格. -
自动离线PDF裁剪, 推荐用pdfarranger, 它还提供了删页与合并PDF等功能, 免费开源, GPL3协议
-
xournalpp 跨平台PDF注释, 关键是支持LaTex, 也可用它修改PDF矢量图
-
专业离线PDF裁剪
推荐跨平台的inkscape, 免费开源GPL协议- 先点击左侧矩形框, 绘制矩形, 也可以绘制其它图形
- Shift与鼠标左键组合上一步的矩形和pdf图
- Object --> Clip --> Set 可得裁剪图形
- File–>Document Properties–>Resize page to drawing or selection
- File–>Save as
-
在线PDF裁剪
有广告但速度很快,功能很强大pdfresizer
速度能接受,批量自动裁剪croppdf
欢迎非商用转载, 转载请指明来源
首页地址 https://kz16.top/
本文来源 https://kz16.top/tex